

How To Install A Camera Doorbell
How to Install a Ring Video Doorbell in 10 Easy Steps
The Ring video doorbell camera is pretty sugariness, simply what if yous're not tech savvy?
Don't worry—installing a Ring doorbell is easier than yous think. Nosotros've put together some easy-to-follow steps based on our own Ring installation experiences, and we've also thrown in a few bonus pro tips and tricks from an experienced technician to help make your Ring doorbell cam installation a breeze.
How to install a Ring video doorbell
-
Attach doorbell wires (optional)
Video: Band's New Cease-to-Cease Encryption
Subscribe to our YouTube channel and larn how to protect your home, loved ones, and belongings.
ane. Gather tools
While each Band doorbell kit contains different extras, they all come with pretty much everything you need to install your doorbell, including a screwdriver, screws, a charging cable (if needed), and installation instructions.
In improver to these, you may need a drill if you accept to screw your Ring Doorbell into brick or stucco. The Ring Video Doorbell 2 and the Ring Video Doorbell Pro come with a special masonry drill bit to make that part easier. Nosotros also recommend that you have a box cutter or flathead screwdriver on hand to aid you remove your old doorbell.

Image: Celeste Tholen, SafeWise
ii. Charge the battery
If yous're installing a Ring Video Doorbell Pro, you can skip this step.
Once you have your Ring unboxed, locate the battery and plug information technology into ability using the included charging cable. We've learned that it can be catchy to get the battery out of the Band two because it's designed for easy popular-out after the doorbell has already been mounted.
We suggest that you hold it against a flat vertical surface (like a wall) to remove it. The wall helps to push the battery out and gravity helps information technology drop downwardly into your hand.
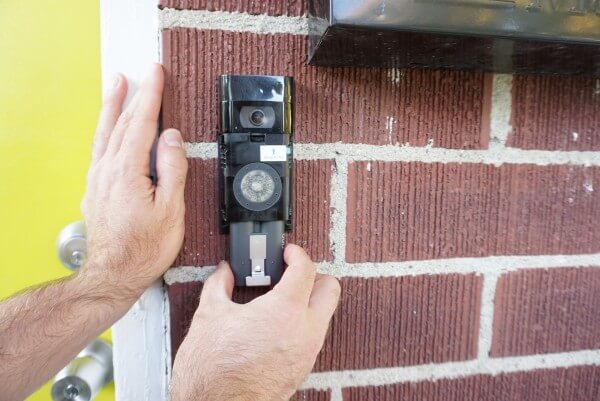
Image: Celeste Tholen, SafeWise
With your battery plugged in you lot should meet a cherry light and a light-green light to indicate the battery is charging. Charging may take 4 to vi hours, and then exist patient. Once the battery is fully charged, the red light will turn off and you'll literally take the green light to get started with installation.
3. Connect to internet
Download the Ring app and follow the onscreen instructions to link your Ring Video Doorbell to your dwelling'southward Wi-Fi network. The app will walk you through everything you need to do, and it takes only virtually 10 minutes to get it all set up upwards and connected.
If your Wi-Fi betoken only isn't strong enough to connect to your Ring video doorbell, consider getting the Band Chinkle.
- Plugs into standard outlet
- Boosts Wi-Fi signal
- Works as doorbell chime
four. Close off power
Go to your home's breaker box (commonly in a garage, basement, or in the rear of your home) and shut off power to your doorbell. This is for condom reasons since you lot'll exist working with exposed wiring.
Skip this step if you don't have an existing doorbell and therefore won't be fiddling with wires. Several Ring doorbell cameras employ batteries, then hardwiring is optional.
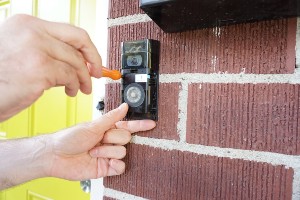
five. Remove erstwhile doorbell
Utilise a screwdriver or boxcutter to remove your quondam doorbell'south faceplate, exposing the screws. Unscrew the sometime doorbell from the wall and gently pull it out, exposing the ii power wires.
The doorbell wires should still be wound around screws on the within of the sometime doorbell, so be conscientious with this role, equally you lot don't want to damage these wires past pulling too hard. Loosen the screws to disassemble the wires and have the old doorbell off completely.
6. Adhere mounting bracket
At this point, your wall should but have the hole where your old doorbell used to be, with the two doorbell wires hanging out. Before you attach your mounting subclass, open up your Ring app and the doorbell'southward live video feed.
- Hold your Ring Doorbell upwards against the surface over the pigsty in the same spot where you're going to mount information technology and check the motion-picture show on your phone to make sure you're getting the bending yous want. If you're not, now is the time to employ one of the angled mounting brackets to tilt the photographic camera up, down, left, or right.
- Once yous've decided on placement, apply the included level tool to make sure the mounting bracket is directly, and utilise a pencil to mark the location for the new spiral holes. Once they're marked, remove the level.
- If you're using an angled mountain, become ahead and attach it to the wall get-go by screwing it in, then attach the mounting bracket to it. Otherwise, screw the mounting subclass directly to the wall over the hole left past your erstwhile doorbell and so the wiring comes through the bracket's pigsty.
Notation on brick and stucco
If you lot're installing on brick or stucco, you'll demand to use the included masonry fleck to drill holes for the small, white plastic anchors used to concur screws in place. Afterward you lot drill the holes in the locations you lot marked, push the anchors in, position the mounting bracket on top of them, and so screw the mounting subclass screws into the anchors.
If you have forest or vinyl siding, don't worry about using the anchors.
7. Attach doorbell wires (optional)
If you want to connect your Ring to your current doorbell chime to prolong its battery life or make your chime band when a company presses the doorbell button, you can at present adhere those ii doorbell wires to your Band.
If you don't have an existing doorbell, y'all can skip this part. Merely make certain y'all purchase a Ring Chinkle for a traditional doorbell feel. Otherwise, you can rely on phone notifications to alert you lot when someone'due south at the door.
Get-go, loosen the ii screws on the mounting subclass that are located directly over the hole where the wiring is sticking out of your wall. So, take the wires and wrap one around each spiral—it doesn't matter which one, as long every bit the wires aren't touching. Make sure each has a good connection to the screw. Tighten the screws gently if needed. Congratulations! Yous've now closed the circuit.
Note on digital chimes
If you have a digital doorbell chinkle (one that makes more of an electronic two-toned audio than the traditional "ding dong" chime), then this is the perfect fourth dimension to attach the included diode. Check your installation instructions for more information nigh this step.
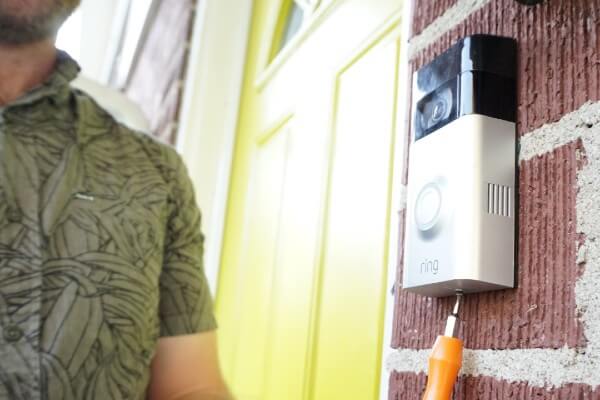
8. Mount Ring doorbell
We've finally reached the exciting function. Position your Band Video Doorbell only above the subclass and press in and down until it clicks into identify. It's okay to utilise a little bit of forcefulness on this step.
ix. Restore power
Time to flip that breaker switch again to make your device live. Go alee and test it out and make sure everything is working. If yous take your Ring Video Doorbell wired to your interior chime and it'southward not chiming, remove the faceplate and double-check that your connections are secure. (If you have a digital chinkle, now is also a good fourth dimension to contrary your diode if necessary.)
If everything seems to be in order, you tin can screw the two included security screws into the underside of the faceplate using the modest end of the included screwdriver.

Images: Celeste Tholen, SafeWise
10. Ready app preferences
Your Ring Doorbell installation is complete. Now you can use your Ring app to play with features, ready your motion detection and nighttime vision settings, choose what kinds of notifications you want, and select what areas you want your camera to cover.
Ring doorbell installation FAQ
Both doorbells take a camera with high-definition video, a motility sensor, two-way communication, and on-demand video. Nest Doorbell (Battery) has pre-recorded messages y'all can play for visitors if you're not available to talk, but Ring doesn't. Nest has 24/7 video recording, but Ring records only motility-triggered events. Ring's starting deject subscription fee costs $2 less a month than Nest's.
The Ring Doorbell spiral size is a T6. If yous e'er lose a spiral or need Band Doorbell replacement parts, y'all can find them onRing.
Related articles on SafeWise
Compare the best domicile security systems
| Brand | Best for | Lowest monitoring price | Starter equipment price | Contract required | Smart home compatibility | Learn more than | Read review |
|---|---|---|---|---|---|---|---|
| | Best overall | $29.99/mo. | $599.00 | | Amazon, Google, Z-Wave | View packages | Read review |
| | Budget selection | $17.99/mo. | $245.00 | | Amazon, | View packages | Read review |
| | Almost experienced | $27.99/mo. | | | Amazon, Google, Z-Wave | View packages | Read review |
| | Best customer feel | $17.99/mo. | Quote required | | Amazon, | View packages | Read review |
| | High-stop DIY pick | $34.99/mo. | $129.00 | | Amazon, Google, Z-Wave | View packages | Read review |
| | Best DIY automation | $20.00/mo. | $279.00 | | Amazon, Apple tree, Google, Z-Wave, Zigbee | View packages | Read review |
| | Best outdoor cameras | $twenty.00/mo. | $199.99 | | Amazon, Google, Z-Moving ridge | View on Amazon | Read review |
| | Best optional monitoring | $xix.99/mo. | $199.15 | | Amazon, Google, Z-Wave | View Packages | Read review |
| | Nearly gadgets | $nine.99/mo. | $85.98 | | Amazon, | View on Amazon | Read review |
| | Almost safety sensor options | $39.99/mo. | $199.00 | | Amazon, Google, Z-Wave | View packages | Read review |


Product prices and availability are authentic as of the engagement/time indicated and are subject field to change. Whatever toll and availability information displayed on Amazon at the time of purchase will utilize to the purchase of this product. Safewise.com utilizes paid Amazon links.
Certain content that appears on this site comes from Amazon. This content is provided "as is" and is subject to modify or removal at any fourth dimension.

Contempo Articles

Dorsum To Top
Source: https://www.safewise.com/ring-doorbell-installation/
Posted by: desmondbaccough.blogspot.com
0 Response to "How To Install A Camera Doorbell"
Post a Comment